

This involves a simple set of steps in Photoshop, which we have shared in the video above. It also shows you how to add a line border around the edge of individual images.
The steps are as follows:
1. Start by opening a blank file.
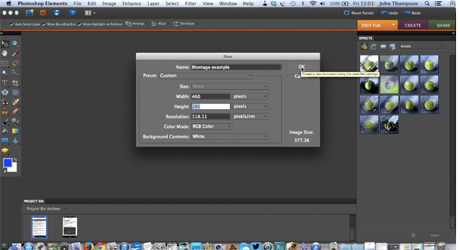
2. Think about the final image. What size does it need to be? Perhaps you are limited based on where you want to publish the montage, or maybe you have a limited width but unlimited (to a degree) length, such as if you're publishing the montage within a standard online article page.
Either way, this is where you set out the size of the final image.
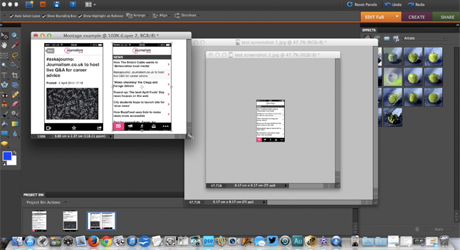
3. Once you have done that you need to start editing the images you wish to include, so they will all fit together in the montage. You may wish to use different sized images, or you may wish to have an even split. This may require a bit of simple maths!
In the example included in the video, I want to create a final image which showcases two screens from our mobile app and I want a small white space between and around them.
Therefore I need to crop the images to a width that is less than half the end width, and just under the final height. Getting this right may require a bit of trial and error.
In this example, because the images are going to have white space between then, I also want to apply a black border to each of them.
This is achieved by simply clicking Select, all, and then Select, Modify, Border, choosing a width of one pixel. This is then applied by going to Edit and Fill Selection. Choose your colour and opacity settings and then hit OK.
Right click and select Deselect to see the border now applied.
4. Do all the above for the other images you want to include in your montage.
5. All that remains is now to bring them together in your final image. Choose your Select tool, and then drag and drop each image into the blank canvas.
6. At this stage you can decide if you want to apply a border to the image as a whole, using the instructions above. Otherwise, it is just a case of saving the image as a Jpeg before publishing it on the relevant platforms.
Free daily newsletter
If you like our news and feature articles, you can sign up to receive our free daily (Mon-Fri) email newsletter (mobile friendly).
Related articles
- 38 mojo apps from BBC trainer Marc Blank-Settle
- How to create viral news videos
- What will be the lasting legacy of the pandemic on the digital media world?
- James Hewes, CEO of FIPP, on the legacy of the pandemic on digital media
- The NYT bets on edgy comedians and vloggers to make its opinion videos go viral


