Master these three levels of smartphone photography
Take simple and stunning pictures by pairing classic techniques with DIY tricks

– 6 min read
Take simple and stunning pictures by pairing classic techniques with DIY tricks
This article was migrated from an old version of our website in 2025. As a result, it might have some low-quality images or non-functioning links - if there's any issues you'd like to see fixed, get in touch with us at info@journalism.co.uk.
You do not need a DSLR camera to capture stunning photos anymore. Your smartphone can do the job just as well.
Jo Bradford is a professional smartphone photographer, a university lecturer and a published author on the subject, having just released her book Smart Photos: 52 Ideas to Take Your Smartphone Photography to the Next Level.
The book offers a range of practical, creative and outside-of-the-box techniques to capture professional photos using your phone. She spoke to Journalism.co.uk about a handful of the newsy applications and clever DIY hacks.
All of these techniques can be used on either iPhone or Android devices using the built-in camera app, but the book does recommend some additional paid-for apps.
Clean your camera lens before shooting. Fingerprints and smudges spoil pictures, so bring lens wipes with you.
When using your camera app, tap on the screen where the most interesting element of your picture is. That will lock in focus and exposure. When snapping humans, tap on their eyes.
Have a stashbox of handy DIY items either on you or in your car, including gaffer tape, black card or paper, tin foil, a large dark cloth, and if you can, a small step ladder. Other useful equipment to have around are a selfie stick and a tripod. Read on to find out why.
You may remember how the media was criticised during the pandemic for showing people allegedly not respecting social distancing on crowded beaches. The flattened angle at which the pictures were taken made the beaches seem more packed than they actually were.
Using an elevated viewpoint can depict a scene in a captivating shot. Find a bench or a nearby vantage point (like a pier) for an aerial shot. Alternatively, you can bring with you a small step ladder or use a selfie stick. In all of these cases, this is where a lightweight smartphone shines.
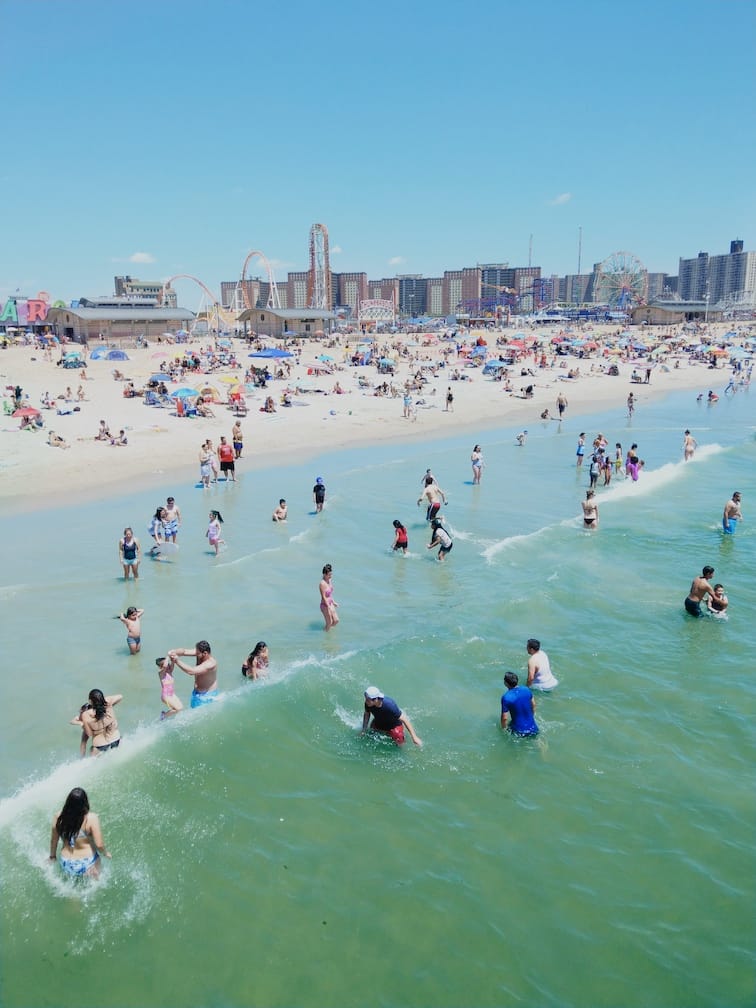
Elevation is also useful for covering protests, as it helps to get a truer sense of crowd density. Use a shutter button (a Bluetooth-powered device) to connect with your phone and take pictures from a height, or use your phone's timer mode.
Get a steady shot by securing a strong body line. Lock your elbows into your ribcage, interlock your fingers to hold the selfie stick and pivot your body left-to-right for stability. When on the ground, tripods can give you extra stability and there are mobile phone holders that can screw into tripods.
Capture a sense of scale by having big objects in the background, like buildings, which then frame the main subject: in this case people on the beach. The trick is tilting your phone to match the angle of whatever you are photographing.
Looking at the beach picture (above), Bradford says: "There I have made absolutely sure that the top of the camera is not tipped forward, because that would instantly make the buildings in the backgrounds look like they were falling over."
To fix a wonky shot, you can use a free post-editing app called Snapseed to straighten the perspective.
All of this also works for close-up pictures, a technique called camera inversion, which can make small objects look big. The same rules apply: frame the shot and get it level. But you will want to lock in your exposure and focus to get a clear picture.
"In the past, photographers would struggle to take pictures with any camera in low-light situations but it's where smartphones excel," says Bradford.
She says the night mode on iPhones 11 and beyond can recognise low light situations and take a series of shots to generate a sharper, composite image as it gathers more light each time. The user can also increase the timer to get a clearer shot.
A more advanced photographer can control light to enhance their shots. Rembrandt lighting is a powerful technique when taking a picture of a person: perfect for your spotlight or feature piece.
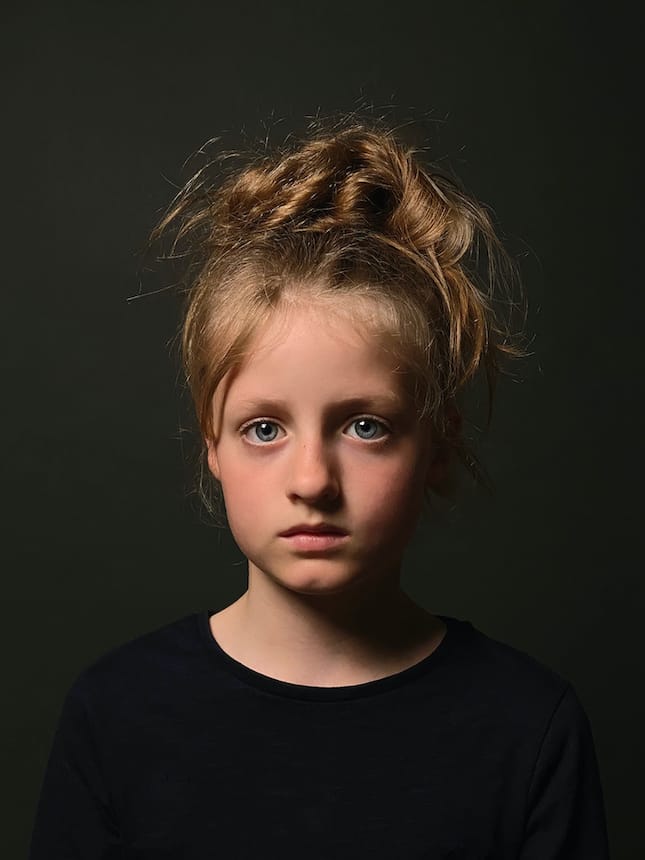
Put a direct and moveable light source (like a lamp) to the side of the subject.
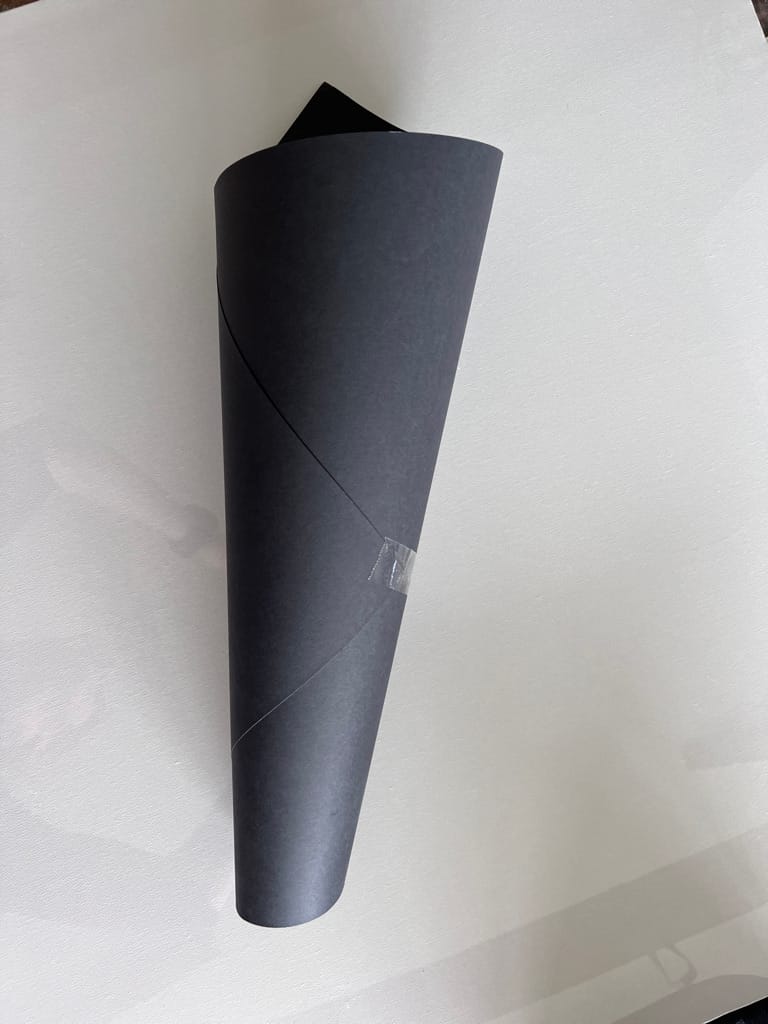
If your light source is too broad, you can narrow it using a "snoot" (see right), which you can make from black paper rolled into a cone.
Next, put a backdrop cloth behind them. Black is the preferred colour to soak up all the light, but lighter colours can be used too. Avoid anything patterned. It is an inexpensive option when there is not a good background available.
"I can turn up anywhere and get a really professional level photograph using that backdrop cloth, and knowing I don't need to provide my own light," says Bradford. "Rembrandt is such a classic photograph and so easy to achieve, but it's only done by people who understand lighting."
The trick to Rembrandt lighting is getting the perfect triangle to appear on the cheekbone (see above) and the shadow forming on the jawline. Move your light source around until the nose casts a shadow and take a straight-on, level picture. It also is not limited to people, the same technique can work for product photography.
News articles can often be very reliant on stock images. Why not create your own? A good understanding of lighting is crucial for a technique known as flat lay composition.
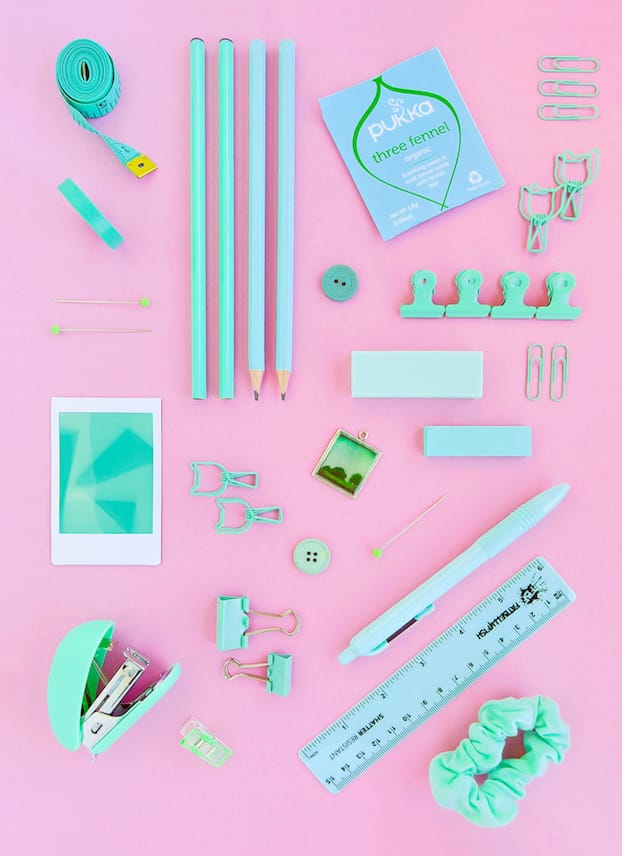
Get creative with your colour schemes but think carefully about spacing items out and fitting them within your frame.
Lay everything down on a board next to a natural light source (normally a window during daytime), and use a reflective material (tin foil is a go-to option, white paper also works) to bounce back the light source.
With light from two directions, this minimises the shadows that the objects will form around them. It also avoids a shadow being cast down onto your picture by yourself. There is no need to nit-pick over the shadows that form inside items, like the stapler in the bottom left-hand corner.
Smartphones will also automatically take care of white balance, something photographers normally have to fiddle around with to balance out colour temperatures. Bradford recommends trusting the smartphone and post-edit the image in the free app Snapseed afterwards, if need be.
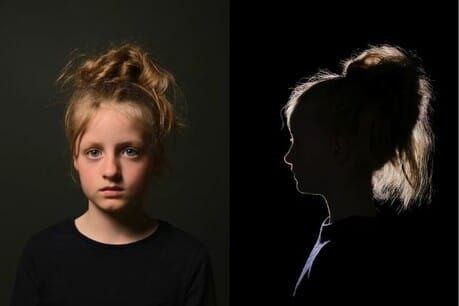
Masters of controlling light can use it to obscure and shroud details. Rim lighting can provide a striking side profile of a person who wants to remain anonymous.
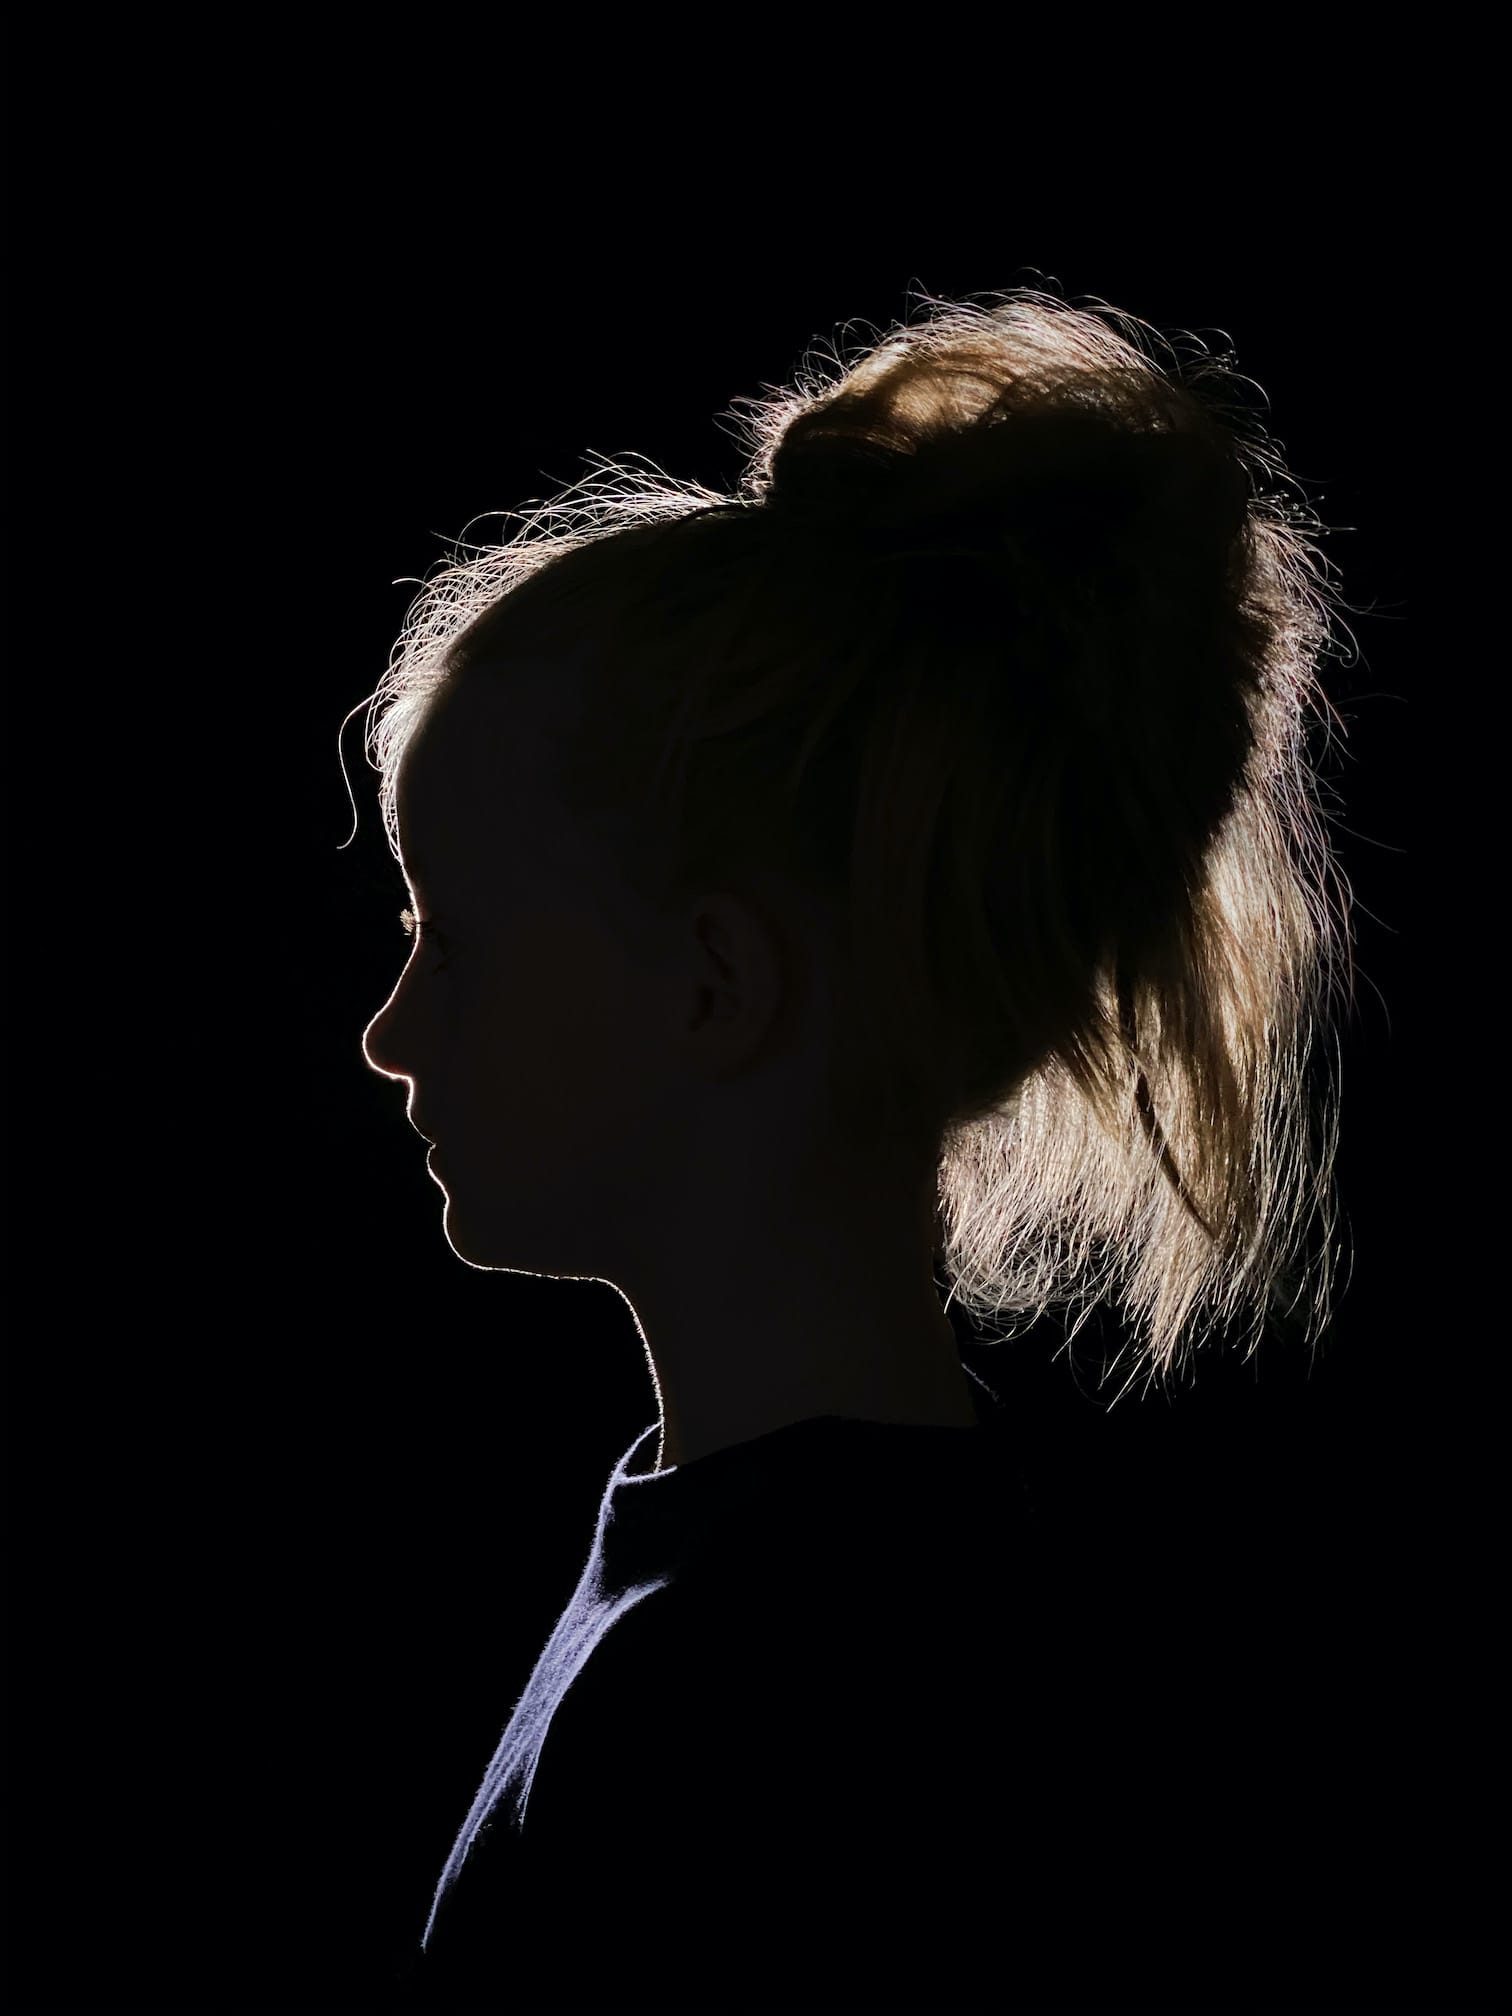
This technique builds on the Rembrandt lighting, but this time the light source goes behind the subject, with a dark backdrop behind everything. Pull the light source closer to the subject until it is out of view, and the light forms a silhouette around them.
Greater anonymity is achieved by increasing the distance between the photographer and the subject. You can also bring the light source further away from the subject to allow more light to spill around the edges, and obscure their image.
The closer you are to the subject, the clearer the details become. That could be a nice artistic choice for a well-known person with a recognisable facial profile.
Where focusing on the eyes is not an option, the nose is a good substitute. Tap it on your smartphone screen to bring it into focus. Adjust the exposure on your smartphone camera app to control anonymity as well. Ideally, exposure should be on its minimal setting here. Remember to use a snoot to help narrow the light source.
Rim lighting brings together all the other techniques. Bradford says: "Controlling your lighting and your viewpoint is key to taking you from an average photographer to someone who can elevate their output to something spectacular."

